Paper origami fighter f18. How to make a paper airplane. Origami - paper fighter
The technique of folding airplanes seems to be mastered by any child and adult. The simplest methods were passed down from parents to children. But there are also more complex models for making paper flying figures, which are known to a few. If you decide to expand your idea of paper figures from childhood, you can see how to make paper planes, the diagrams are laid out just below.
To fold the figures, you do not need glue and additional materials. All you need to prepare is thick paper. If you have not yet encountered complex origami designs, then you should start with simple models.
simple origami airplane model
- Take an A-4 paper and fold it in half.
- Bend the top corners of the resulting rectangle to the center. Straighten the just folded triangles and fix.
- Wrap the obtuse corners of the resulting rhombuses back.
- Wrap two side corners back, forming a regular triangle.
- Bend the workpiece and unscrew the wings.
- Bend the tips of the wings and insert perpendicularly. You've got a fighter.
Paper fighters fly well, so you can launch your invention into the air.
To make it clear how each fold is performed, you can use the video "origami paper planes" that we attach to the article. You will be able to go through the process step by step with the master, comparing your work with his.
Using the origami technique, you can create flying planes. A simple design can also take to the air, but there are more impressive models that can take more than an hour to fold.
The coolest are those designs that evenly plan for a fairly long distance. So, for example, this paper airplane, despite its simplicity, pleases with its movements in the air.
Model of a simple paper airplane-stuntman

- Fold the square first horizontally, then vertically. Expand the sheet.
- Fold the top towards the center.
- Wrap the top corners, but do not connect in the center.
- Unfold the corners, forming a triangle.
- Bend the top of the triangle. Fold the design in half
- Wrap the right corner inward (step 7).
- Open the wings.
This is the instruction for folding the stunt plane. Launching such crafts into the air will bring pleasure to both children and adults. It makes intricate circles in the air and flies quite far.
Origami planes with good aerodynamics
In addition to airplane figures, there are also origami birds that are launched into the air.
- Fold the square sheet diagonally.
- Fold the resulting triangle in half.
- Open one triangle into a square and press.
- Turn the workpiece over and bend the corner into a rhombus.
- Make fold lines of the three corners of the rhombus: side and top.
- Peel off the top layer and press down.
- Turn the workpiece over and do the same on the reverse side.
- Bend the bottom corners of the diamond and connect them by putting the tips of one into the pocket of the other.
- Spread the upper triangles apart and fix. For children, it is very important that the craft perform some kind of action. Therefore, the product must have wings to stay in the air.
- Fold the top layer of the bottom corner up. Bend the nose down, then back up.
- Turn the workpiece over and form the tail.
Such a swallow will be able to perform a relatively short flight. But you and your kids will be enchanted by the paper birds game. Try to make a lot of swallows with your child and organize a large-scale flight to the south. The child will benefit from such an activity in many ways: the development of finger motor skills, physical activity during the game and strengthening relationships with parents. After the game, the crafts made can be hidden for the next time or presented to someone.
Video tutorials to help beginners
In this article, you will be presented with several popular aircraft schemes that differ from each other not only in appearance, but also in flight properties. To create origami, you only need a sheet of paper 20x30 cm or A4. All models may well be assembled by a child of 5 years old with their own hands without the help of an adult. At the end of the article, a detailed description of the paper airplane is very similar to a modern fighter.
How to make a flying paper plane popular schemes.
1. Planes made according to the first and second schemes are the most common. Such an origami is going to be done with your own hands quite quickly, despite this the plane flies far enough due to its design.
2. As mentioned above, such a paper plane is the basic model. Almost all children and adults know it.

3. A feature of this model of the aircraft are wide wings, similar to a paraglider. This design allows it to soar high in the air. With proper, uniform folding such a paraglider can fly long, far and, most importantly, beautifully. Don't expect super speeds from him.

4. This model was obtained as a result of the modernization of the first and second schemes. A distinctive feature of the aircraft model is its fast and uniform flight. Due to the front supporting wings, the nose does not collapse, providing a long flight.

5.
Also a very interesting paper airplane design. It assembles very quickly and easily with your own hands. In terms of speed, it is certainly inferior to some previous schemes. But a good, stable, long flight will give your child. 
6 . The model looks like a large passenger plane. It cannot boast of a flight range, but it flies quite beautifully from a great height.

7. A very unusual paper fighter. It assembles easily, flies quickly and for a long time due to the balanced design.

8 . Sleek design and wide fenders will delight you long, fast flight.

9. The plane looks very unusual, looks like a fighter. Don't expect any superpowers from him. He will delight with his unusual and complex assembly process with his own hands.

10 . The scheme is very similar to scheme number 8. However, the nose of such a model is very steep, it folds much more accurately. It doesn't affect the flying properties in any way.

11. The shape and design resembles model number 9. Only it is a little easier to assemble and flies a little further, due to the ribs on the wings.

12. One of the varieties of a fighter with fender liner down. The launcher of such an aircraft will enjoy a steady, fast flight very much.

How to make a far flying fighter plane out of paper.
Above, phased diagrams of airplanes were provided. Finally, we have reached the best. Now you have to get acquainted with a step-by-step origami photo instruction, assembling the farthest flying fighter. The aircraft not only has good flying properties, it also looks great and will give you a lot of positive emotions.
Detailed, step-by-step photo instruction, wonderful origami.

1
.
We need an A4 sheet, it is advisable to take thin paper, so a do-it-yourself plane will fly even further. You can choose the color of your choice. Fold and unfold the sheet in half along the short side. 
2
.
Fold the sheet in half along the long side. 
3 . We bend, iron one corner as shown in the picture.

4 . With the second corner, we do the same as in step number 3. It should turn out as in the photo.

5 . We turn the resulting corners in half again, iron it well with our own hands.

6 . Open each side and fold inward.

7 . You should get the following.

8 .

9 . We bend the upper part of the plane out of paper on both sides.

10 . Flip the piece over and do the same on the other side.

11 . Open both parts along the fold line. Look carefully as shown in the photo.

12 . On the other hand, we do the same, we should get an isosceles triangle.

13 . Fold the figure in half along the fold line. We will receive as shown in the picture.

14 . We outline a line on both sides about 2.5 cm from the base of the aircraft. We will bend our future wing along this line.

15 . Gently bend and iron one wing from the beginning.

16 . Folding the second wing

17 . Draw another parallel line. We will need it for precise bending of the stability wings.

18 .

19 . On the second side, in the same way, draw a line and bend a corner along it.

20. At your discretion, you can make small flaps, if they are done carefully and slightly bent, your fighter will fly a little further. Also, these fender liner will keep the stability wings at right angles.

Congratulations, you just learned how to make a paper airplane. If necessary, you can glue the base of a far-flying aircraft with your own hands. 
In Joanna Ferrius' tale "About the Paper Airplane," a makeshift airplane, hastily folded from a notebook sheet, had a very specific task: to fulfill the cherished dream of its creator. But a paper plane is capable of not only granting wishes, as the legend says. A simple toy that costs nothing will lure a restless baby for a long time, developing his creativity, accuracy and motor skills. Yes, and for adults, a paper airplane will help diversify their leisure time: you can arrange a competition for flight distance or compete in the ability to fold complex airplanes. Let's figure out together how to make a paper plane!
Making an airplane out of paper
Where did paper planes come from?
The airplane made in the origami technique, firstly, owes its origin to the history of China, where paper was invented and where origami was born - the art of folding figures from pliable material. And secondly, a paper airplane in its modern form is the tricks of quite serious aviation test centers, where paper models of airliners and military aircraft have been used to assess the aerodynamic properties of the structure since 1930.
 origami fighter
The first to start testing aviation developments using a paper fighter were the Americans - the Lockheed Corporation concern. Later, paper airplanes spread everywhere, becoming an exciting hobby for the townsfolk of any gender and age. There were a huge number of ideas on how to make an airplane out of paper that flies. Folding an airplane from a sheet of paper is not difficult, but it is advisable to prefer its lighter types - loose A5 sheets (used most often) or A4 landscape pages.
Step-by-step instruction
A lot of sources tell about how to make an airplane out of paper - more than 100 craft options are already known to origami fans. You will soon be able to master each of them, but for starters, let's use a regular sheet and 2 basic diagrams. Try to make your first plane step by step following the suggested instructions. Then you can move on to mastering complex options or developing your own model of a paper plane that flies best.
Option 1 "Airplane"
 Classic paper airplane
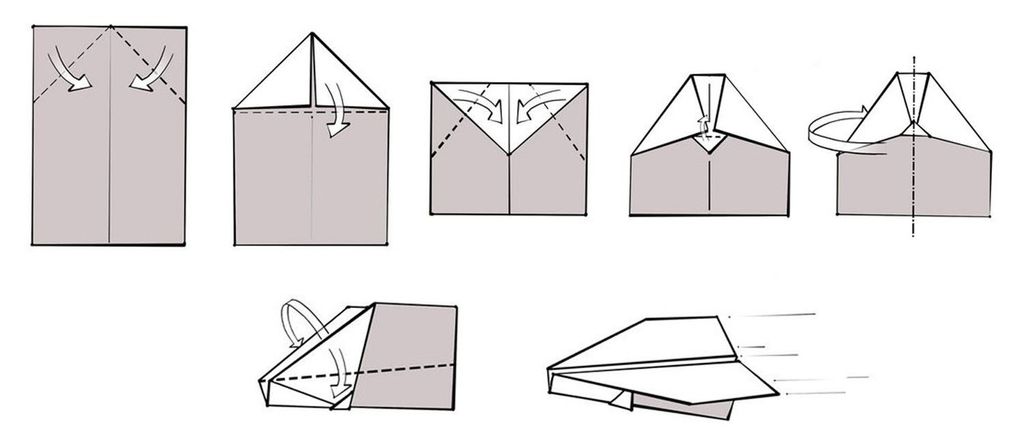
- Place a sheet of paper in front of you (vertically). Let's call the upper corners points A and B.;
- Bend the upper corners inward, bringing points A and B together and forming the correct pentagonal "house" from the once rectangular sheet (see Fig.);
- Wrap the upper corner of the workpiece inward, forming a square from the former pentagon, squeeze the folds of the sheet;
- Like step 2, fold inward the upper corners, but do not form the correct corner at the top (see fig.);
- Fix the structure by bending the resulting fixing corner towards you in the center of the workpiece;
- Turn the craft “face” down, and then fold the future airplane vertically inward (towards you) exactly in half;
- It remains to bend each wing towards you, giving it the desired shape and sufficient area for a successful flight;
- Straighten the paper airplane, set the desired wing angle (90° or more) and launch it by holding the craft by the fixing corner in the middle of the toy.
Option 2 "Fighter"

- Fold a vertical sheet of paper in half lengthwise, as shown in the diagram;
- Like folding the Airplane, fold in the top corners to form a 5-corner house;
- Repeat a similar folding of the sheet inward, forming an already acute-angled "house";
- The next folding of future wings inward will make the workpiece even more “sharp”;
- Turn the workpiece "face" down, and then fold the product vertically "inside out";
- Bend the wing of the aircraft on each side, it should capture the entire original length of the workpiece;
- Set the right angle to the wings of the airplane and launch it by holding the toy by its bottom.
This basic step-by-step instruction allows you to master the basics of “aircraft building” using the origami technique. A cool plane that flies 100 meters or more will not work right away - you will need to hone the skill of folding the toy. Experimenting, try to create different models (changing the angle and area of the wing, the width of the nose, etc.). Each time the toy will behave differently and its volatility will directly depend on the aerodynamic properties and correct folding.
Why do some models fly far and well, while others do not?
You can fold a simple paper airplane with your own hands in a minute, but will it stay in the air properly if made hastily? Will it not fall unsightly, and not soar gently, cutting through space? A good airplane is one that flies for a long time and glides confidently, standing firmly on the wing. But you need to fold it slowly, carefully checking the fold angles of the paper sheet and accurately setting the proportions of the toy. Far, confidently and well, only that airplane flies, in which the center of gravity is optimally balanced, the wings are the same in size and the dynamics of which are not hindered by unnecessary “corrected” bends of the sheet.
Don't know how to properly fold a toy that will proudly fly far ahead, and not fall off the flight path without starting it? Then just stick to the basic patterns of folding models, trying to improve in the accuracy of their manufacture with each new airplane. You can use small lumps of plasticine to weight the bow or unbalanced wing. Be experimental by creating a really cool plane from a simple sheet of paper. Mastered simple schemes? Then feel free to start replenishing the toy squadron using more complex options for folding paper planes using the origami technique. By the way, you can replenish your collection of paper technology not only with the air fleet, but also with the sea. For example, by folding or constructing a wonderful one with two chimneys. Well, below we give several schemes of unusual, beautiful, and most importantly, flying paper crafts: try them all, and then tell us in the comments which one flew farther!
Many of us (yes, almost all of us!) folded paper airplanes as children. But until now, not all moms and dads know that they were doing aerogs, one of the branches of origami. In Japanese, by the way, it will not be aerogami at all, but kami hikoki - kami \u003d paper, hikoki \u003d airplane. So today we present to you the 12 most popular models of kami hikoki - paper airplanes that are ready to bravely cut through the expanses of the ocean of air and will undoubtedly delight your children!
Glider #1

Glider #2

(Click on diagram to enlarge)
The use of paper to create toys is believed to have started 2,000 years ago in China, where kites were invented. The modern paper airplane, according to one of the most popular versions, was invented (yes, yes, that's right!) In 1930 by Jack Northrop, co-founder of Lockheed Corporation. Northrop used paper airplanes to test new ideas while building real airplanes.
"Silk" (Silke)

(Click on diagram to enlarge)
"Drake" (Canard)

(Click on diagram to enlarge)
"Delta"

(Click on diagram to enlarge)
In 1989, Andy Chipling founded the Paper Aircraft Association, and in 2006 the first paper airplane launch championship was held. Competitions are held in three disciplines: the longest distance, the longest planning and aerobatics - the performance of aerobatics by paper models.
Shuttle

(Click on diagram to enlarge)
However, there are also commercial competitions. Perhaps the most famous of these is the Red Bull Paper Wings. The last world championship was held in Austria, the designers competed in three categories: "aerobatics", "flight range" and "flight duration".
"Gomez" (Gomez)

(Click on diagram to enlarge)
Numerous attempts to increase the time the paper airplane stays in the air from time to time lead to the taking of the next barriers in this sport. Ken Blackburn held the world record for 13 years (1983-1996) and got it again on October 8, 1998, by throwing a paper plane indoors so that it stayed in the air for 27.6 seconds. This result was confirmed by representatives of the Guinness Book of Records and CNN reporters. The paper airplane used by Blackburn can be classified as a glider.
"Locked" (Locked)

(Click on diagram to enlarge)
Although it is believed that light paper airplanes fly farther than heavy ones, this claim is disputed by Blackburn. Blackburn's plane, which broke the world record in 1983, was designed on the assumption that the best planes have short wings and are "heavy" during the launch phase when a person tosses them into the air. Although longer wings and lighter weight would seem to help the airplane achieve longer flight times, such a paper plane cannot be thrown high. According to Blackburn, "to achieve maximum altitude and a good transition to gliding flight, the throw must be carried out with a deviation from the vertical of no more than 10 degrees."
Folding all kinds of airplanes in various papercrafting techniques is one of the most fun ways to spend time with your child. And what opportunities for creativity! Aircraft can be painted with felt-tip pens and paints, hung from the ceiling in a room, arrange air wars. In the paper origami technique, the planes are nimble, stable and realistic. It turns out that the choice is not limited to one simple model that you mastered back in school.
In this article, we will figure out how to make origami planes, because paper can be used to assemble both elementary and complex types of aircraft.
Before you start making origami paper airplane, read the following guidelines:
- For large crafts, take a thick paper sheet.
- Make small parts from thin sheets.
- Use a metal ruler and a utility knife to make cuts and folds even.
- For gluing, use transparent types of glue.
- Follow the accuracy of the work, observe the symmetry, make the folds and cuts even.
Note! The best flight is provided by a large area of the wings, and the curved wings improve the aerodynamic properties. You need to launch the airplane up at an angle of about 40-45 degrees.
Now you can start creating origami planes: paper assembly diagrams are presented below.
Simple Options
We begin to make an origami plane out of paper. The scheme of each model is presented in detail and clearly. Even a child will assemble most of the following twelve models, following the instructions step by step or repeating after an adult. First, practice on elementary types of aircraft, then move on to models that require more care and perseverance.

Note! The dotted line in all schemes marks the fold lines. On them you need to fold the sheet in order to preliminarily outline the places where further bending of the sheet will be formed.
- A glider or an arrow is the simplest type of origami paper airplanes that fly quite well over short distances. Glider is able to fold every child, starting from kindergarten age.
The first way is the basic model of a glider with a sharp nose. If you learn how to launch it correctly, it will fly for quite a long time and smoothly.
Slug-nosed variant - The arrow has a good air glide range.

Complex options
Having stuffed your hand on the previous twelve models, you can turn your attention to origami paper planes for tricks of varying degrees of complexity. Here begins a real paradise for those who like to make complex aircraft.


Below is a detailed instruction with pictures:
- Take a colored sheet of A4 format. The thinner the sheet, the higher the flight range.
- Form a fold in the center along the long side.
- Bend the workpiece in half lengthwise.
- Bend and carefully iron one corner.
- Repeat the same with the second corner.
- Fold the corners in half again and press the folds with pockets.
- Open each corner and fold inward to make two rhombuses on both sides.
- Wrap the corners inward, closing the pockets.
- Bend the top corners as shown.
- Also turn off the corners on the other side.
- Open the pockets again by folding back the pieces on one side and the other.
- Fold the design along the original fold line.
- Draw a line approximately 2.5 cm long from the bottom edge of the sheet.
- Bend two wings along the drawn line.
- Draw another line on each wing as shown in the photo.
- Bend both wings - these will be the stability elements of the aircraft.
- Make flaps to increase the flight range and give stability to the vertical elements of the wings.